Class Meeting 25 (11) Deploying your dashboards on Heroku
This lecture is 90% complete
25.1 Today’s Agenda
- Announcements:
- Milestone 6 is released
- Assignment 6 will be released later today (apologies for the delay)
- Our repl.it for today is here
- Part 1: Course Overview [10 mins]
- The big picture
- Teaching Evaluations for Firas
- Part 2: Deploy the class app [30 mins]
- Install Heroku Command line interface
- Copy the required files to your repo
- Push the class app to Heroku
- Part 3: Explanation of the required files [20 mins]
Dockerfileapt-packagesheroku.ymlapp.jsoninit.R
- Part 4: Dashboard reviews [20 mins]
- Explanation of process
- Breakout sessions
- Debrief
25.2 Part 1: Course Overview [10 mins]
The big picture
25.3 Part 2: Deploy the class app [30 mins]
Alright, let’s get started with deploying our class Dash app on Heroku! There are a few things you need before we get started:
25.3.1 Heroku Account
Please make sure you have created a (free) Heroku account
Note as with most online companies and services, Heroku servers reside in the United States. If you have privacy concerns about your data, you may create a secondary email with a nickname and no other personally identifiable information.
If you are aware of the privacy implications and are comfortable, you may just “Log in with your GitHub account” or create a new account with an email address.
25.3.2 Heroku Command Line Interface
You will also need to install the Heroku Command Line interface (CLI) to issue commands to Heroku for your app.
25.3.2.1 Windows Users
Instructions for windows users:
- Visit this page.
- Select the 32-bit or 64-bit version of the installer.
- If you need to check, here are the directions from the website:
- Run the installer.
25.3.2.2 macOS Users
Instructions for macOS users:
- Visit this page.
- Download the Installer.
- Run the installer.
25.3.2.3 Ubuntu Users
Instructions for users on Ubuntu 16+:
- Open a new terminal
- Run this line of code:
sudo snap install --classic heroku
25.3.2.4 Confirm the heroku CLI is installed on your machine
- Open a new terminal/command-prompt.
- Run this line of code:
heroku --version - You should get an output that looks like this:
heroku/7.35.0 darwin-x64 node-v12.13.0If you get an output with heroku version greater than 7, you should be good to go!
25.3.2.5 Configure the heroku CLI
These instructions have been adapted from the Heroku CLI installation instructions.
Now that you have the heroku CLI installed, we need to link it to your heroku account.
In the same terminal, type:
heroku loginA browser window should open up asking you to authenticate with your heroku account. The CLI saves your email address and an API token to ~/.netrc for future use. For more information, see Heroku CLI Authentication.
Now you’re ready to create your first Heroku app!
25.3.2.6 Deploy your app to heroku
- First, open a new terminal and create a new directory in a temporary location (not in your participation folder), perhaps something like
~/Downloads/tmp. - Navigate to that
tmpdirectory (it can be called anything, but it CANNOT already be a git repository). - Fork the classroom app repo.
- Grab the clone URL and clone it into the tmp folder:
git clone https://github.com/<<your_username>>/deployed_class_app.git- Change directory into the
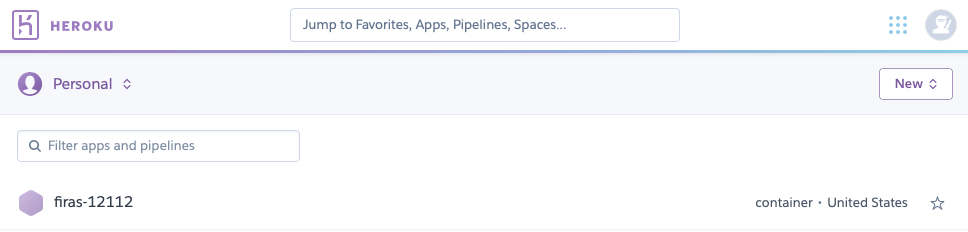
deployed_class_appfolder (cd deployed_class_app). - NEW Run the following command to create a new app with a name of your choice (firas-12112 below), and set its “stack” as container (this will be explained in Part 3).
heroku create firas-12112 --stack container- NEW If you were successful, you should see a message like this:
Creating ⬢ firas-12112... done, stack is container
https://firas-12112.herokuapp.com/ | https://git.heroku.com/firas-12112.git
NEW Next you need to add 5 files from today’s repl.it OR from here to this repository, commit, and push it.
NEW Go to heroku.com and log in. You should see the new app you created!
- NEW Click on
Deploy, thenGitHub. You will need to authenticate and connect your GitHub account with Heroku.
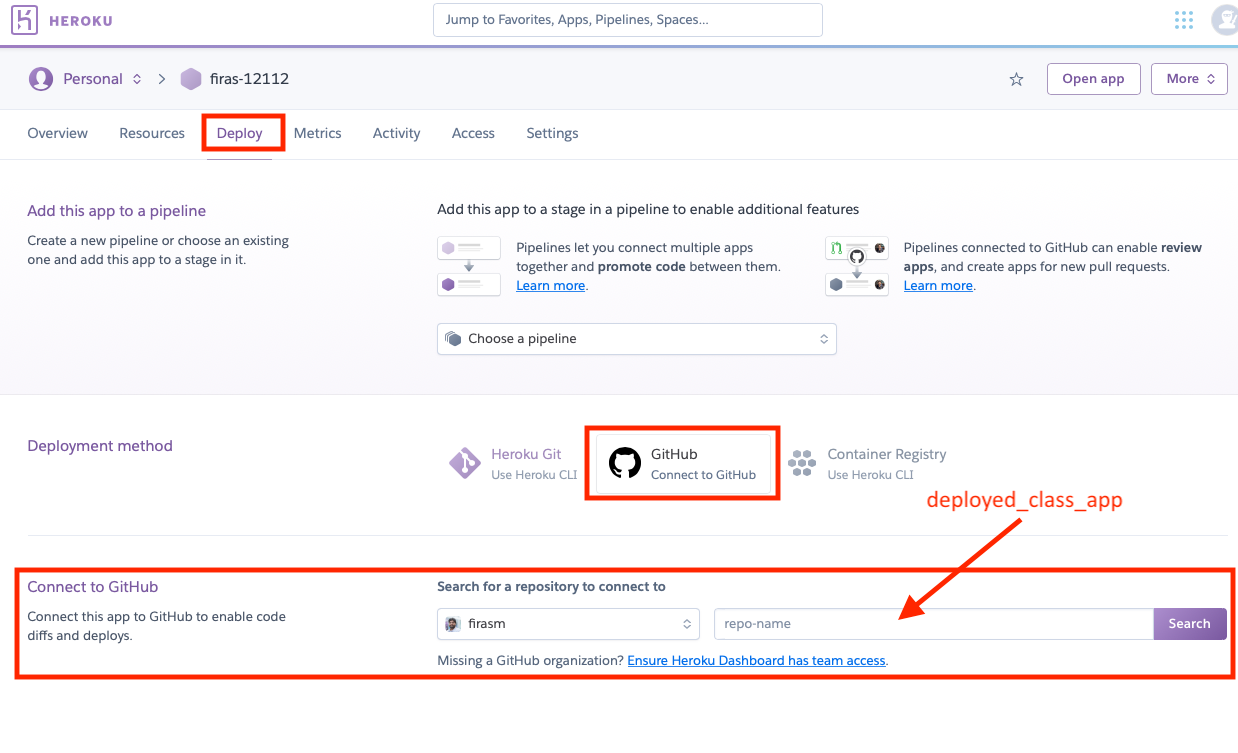
NEW Search for the app you’d like to deploy (the one you forked).
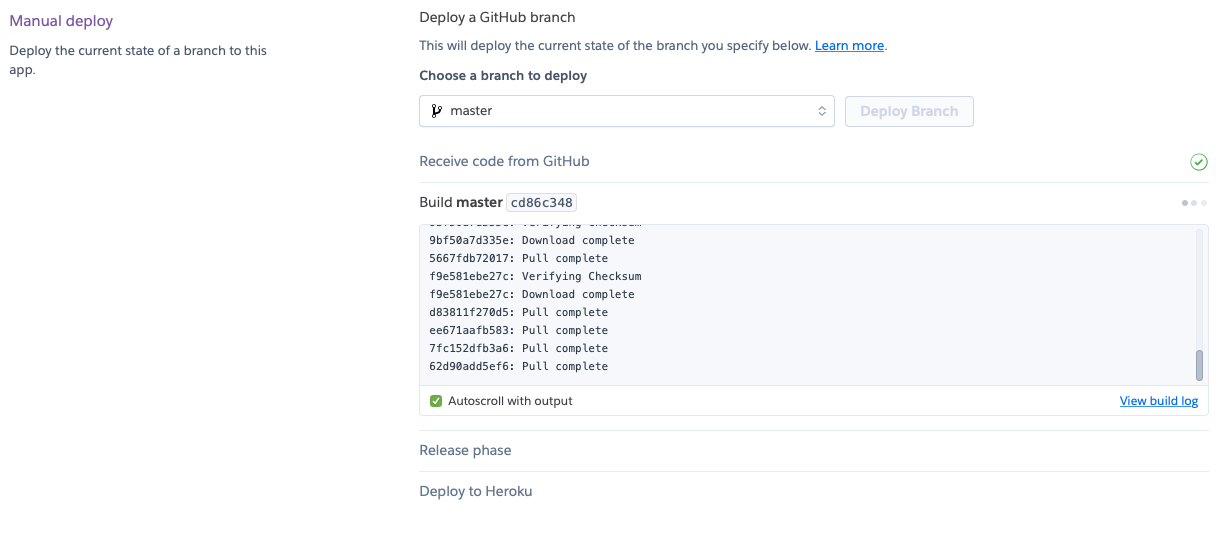
NEW Under the
Manual deploysection, choose the master branch to deploy and clickDeploy Branch.
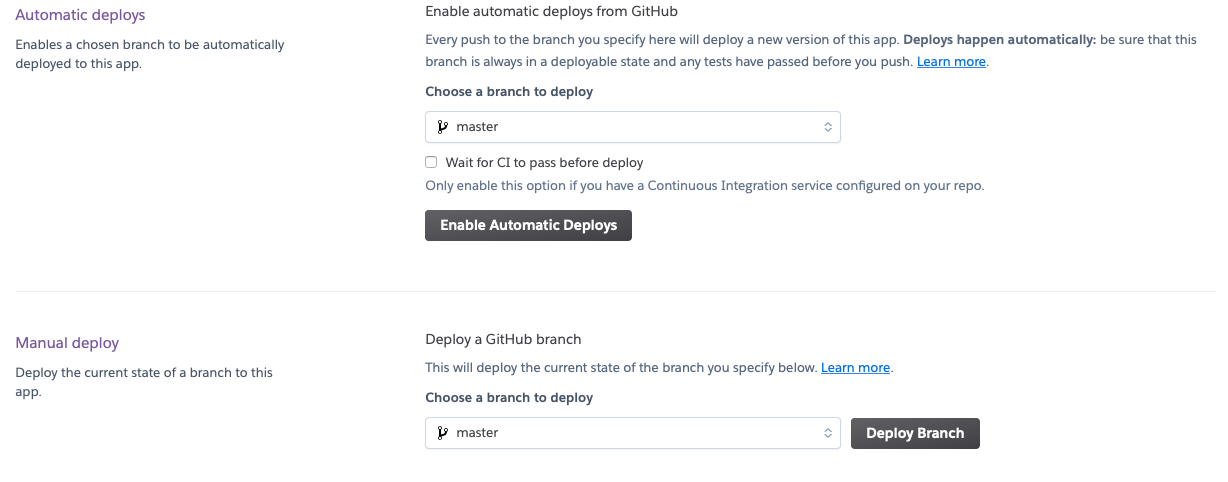
- NEW Heroku will then attempt to recreate the entire environment to run your app. This will take at least 20-30 minutes
That’s it! Now you wait! Once the app is finished building, heroku will tell you the app is ready and the URL will be something like: https://firas-12112.herokuapp.com.
Don’t forget to submit a link to your functioning and deployed Dash app as part of cm111 participation:
## YOUR LINK TO THE DEPLOYED APP HERE25.4 Part 3: Explanation of the required files [15 mins]
Let’s go through each of these files and describe what they do.
apt-packages: List of (ubuntu) system packages that need to be installedinit.R: List of R packages that need to be installedDockerfile: This file is like a “Makefile”; it contains a list of “scripts” that need to be run, and then at the end run theapp.Rfileheroku.yml: Tells Heroku that this is a web application that uses a Dockerfile for configuration.app.json: Description of the app
25.5 Part 4: Part 4: Dashboard reviews [20 mins]
It is extremely valuable to get feedback on your dashboards because creators often develop blindspots and having another person look at it will give you additional perspective. We will do that today in class!
Here is how we will do this activity:
- You will be randomly paired up with another person from a different team in a different breakout room.
- Between the two of you, you will first decide who will be the first to get feedback (person A). The other will give feedback first (person B).
- Person A should give person B two things:
- The link to person A’s project repository.
- The tagged release or commit SHA of the version of the dashboard person A would like to get feedback on.
- Person B will now share their screen with Person A.
- Person B will now open a new terminal window and clone person A’s dashboard.
git clone -b <tagname> <repository url>.- Then,
Rscript app.R. - Then, open a browser and visit http://127.0.0.1:8050.
- At this point, person A should not say anything and silently listen and take notes. This will go on for about 3 minutes while person B goes through the dashboard looking at it for likely the first time (as most other users will be).
- Person B should vocalize everything they are thinking and doing as they go through the dashboard (trust me, it will really help the other person!)
- Once Person B is done interacting with the dashboard, this is the time for a discussion and Q&A and to address any confusions or misunderstanding.
- It will be hard for Person A to stay silent, but it is very important as it will highlight any deficiencies in existing instructions, directions, and sign-posts.
- This process should take about 10 minutes total and when directed, the partners will switch roles do the activity again.
Both Person A and Person B should take notes and record them in an issue in their own repository. They should provide a link to this issue for full participation marks for today’s class.
## YOUR LINK TO THE ISSUE YOU CREATED WITH FEEDBACK ABOUT YOUR APP HERE