Class Meeting 16 (2) Git workflows
library(tidyverse)
install.packages('tictoc') # you might need to install this new package: install.packages('tictoc')
library(tictoc)
library(datasets)
library(glue)
16.1 Today’s Agenda
- Announcements:
- Reminder about Assignment 1 and milestone 1 due on Saturday at 6 PM
- By now you should have already gotten in touch with your partner. If you are having troubles, please send me a private message on canvas
- If you would like someone from the teaching team to approve your dataset, please create an issue here
- Part 1: Git and GitHub for collaborative work (20 mins)
- Sensible workflow for local work
- Setting up your project repositories
- Dealing with merge conflicts
- Part 2: More about fork and clone workflow
16.2 Part 1: Git and GitHub for collaborative work
- Git class demo with Firas & Yulia
- Class activity with your partner
- Try to sit with your project partner
- If you are auditing the course, try to find another who is so you can do this part with someone else
- Tips and tricks on how to handle merge conflicts.
16.2.1 Create your project repo and add your partner as admin
- Go to the STAT547 - Spring 2020 organization
- On the right of the page, click the green “New” button
- For the repository name, set it to “group_xx_yy” where xx is your group number (from canvas) and yy is an optional name of your repo
- Keep this repo private (for now)
- Initialize the repo with a README, add a .gitignore file (for R) and a license (MIT is fine).
- Once at the home page of your repo, click “Settings”, then “Manage Access”
- Add your team member, and give them Admin access.
- THERE IS NO NEED TO add any of the teaching team to your repo, we will have access as long as it’s created inside the STAT547 organization.
16.2.2 Setup your local directories, and RStudio to work nicely with GitHub
- Locally on my machine, create a new folder called stat547 in a sensible place:
- Create folders for each of your main areas:
Discussion,assignments,project,participation - On GitHub.com visit each of these repositories and copy the git repo URL into these spots
Discussion: https://github.com/STAT547-UBC-2019-20/Discussions.gitassignment_01: ## LINK TO THIS REPOparticipation: ## LINK TO THIS REPO
- Create a new RStudio project for each of the repos above
- Open RStudio then click File >> New Project >> Version Control >> Git
- In the “Repository URL” field, paste the URL for one of the repos above
- In the “Project directory name” field, you should leave this as the name of the repo to avoid confusion
- In the “Create project as subdirectory of:” field, use the
from Step 1. - Click “Create Project”
- You should repeat this step (Step 4) for every assignment that you accept in STAT547.
- Now you have correctly set up RStudio with Git so you can commit, pull, push, etc… right from RStudio!
- At the beginning of every lecture, open the “Discussion” RStudio project. Then click on the “Git” tab, and then pull the latest
cm1xx_participation.Rmdfile directly to your computer. Copy it to your participation repo, commit it, and then push.
16.2.3 Activity 1: Fork and clone workflow
For your team project, you should be working in a “fork and clone” workflow (unless you consider yourself a git master). More details about this workflow are described here in happygitwithr.com
Here is what you need to do:
- Go to your project repo, called
group_xx_yy - Click the “fork” button on the repo home page
- Make sure you fork the repo within the STAT547 organization
- Copy the URL of YOUR fork of the main project repo
- Git URL of YOUR fork: ## LINK TO THIS REPO
- Also grab the URL of the MAIN PROJECT REPO
- Git URL of MAIN PROJECT REPO: ## LINK TO THIS REPO
- Create a new RStudio project and repeat Step 4 from the previous section for YOUR FORK of the main project repo
- Now, we need to “link” the main project repoto YOUR FORK so you can send your changes back to the main project repo, and also receive any changes your partner made. To do this:
- In RStudio, find the “Terminal” button and click on it
- Now you’re in a Terminal/Console (yes, within RStudio, weird - I know)
- Make sure you’re in the correct directory (YOUR FORK cloned locally) by typing in
pwd - Type this command to link the MAIN PROJECT repo to your fork:
git remote add upstream <MAIN_PROJECT_REPO_URL>- Done!
- To check if it worked, type this in the RStudio console:
git fetch upstream- If there are changes it will let you know what they are
- Once you’re ready to pull the changes into YOUR FORK of the MAIN PROJECT repo, use this command:
git merge upstream/master- This will merge all the changes from the upstream URL (
) into your fork - Do this often!
- It is best practice to create a new branch in a forked repo so your work isn’t committed to master:
git checkout -b name_of_your_new_branch
16.2.4 Activity 2: Send a PR from YOUR FORK back to the MAIN PROJECT
- Will be demo’d
16.2.5 Activity 3: “Catching up”
- Accept a PR from your partner in the MAIN PROJECT repo
- Merge those changes into YOUR FORK using
git merge upstream/master- Deal with any merge conflicts that arise
- Send another PR now with even more changes, hopefully if everything was done correctly, the new changes should allow us to easily merge the PR in with the main code.
16.2.6 (Optional) Activity 4: Class wide
You can do this all on GitHub.com - no need to clone locally.
- Fork this git demos repo
- Create a branch called ‘my_change’
- Make a change in the
introductions.mdfile - Create a PR and send it to the main
git_demosrepo - Let’s see if we can get all 30 PRs merged in!
16.2.7 Final: Provide links for the various sections of the git activity:
- Link for your fork of the project repo: ## YOUR LINK HERE
- Link to the Pull request (PR) you sent in the main repo: ## YOUR LINK HERE
- Link to the commit after fixing the merge conflict in the main repo : ## YOUR LINK HERE
- Link to the commit after you pulled changes from the upstream branch
Happy Git with R is the most relevant for new R users, it was written by Jenny Bryan and others.
For more information on some tips of configuring RStudio to work with git, see this support article.
16.3 Part 2: Fork and clone workflow
This section of the lecture notes have been adapted from Jenny Bryan’s HappyGitWithR
For the team projects in STAT547, we will be using the “Fork and clone” method to work collaboratively together and send changes back to the main repository (that each partner forked) via Pull Requests. In general, use “fork and clone” to get a copy of someone else’s repo if there’s any chance you will want to propose a change to the owner, i.e. send a “pull request”. There are several other workflows for working collaboratively, and another popular one is called branch and PR - but that is not what we’ll be doing in this course.
16.3.1 Initial workflow
Sign in to GitHub navigate to the repo of interest.
Think of this as OWNER/PROJECT, where OWNER is the user or organization who owns the repository named PROJECT.
In the upper right hand corner, click Fork. For each GitHub account, you can only fork the repo once. Subsequent clicking on the FORK button will tell you that you’ve already forked this repo.
This creates a copy of PROJECT in your GitHub account and takes you there in the browser.
Now we are looking at YOU/PROJECT.
One way to tell whether you are in your fork (YOU/PROJECT), or the original OWNER/PROJECT is to check the name of the repo on the repo home page.
See below for markers:
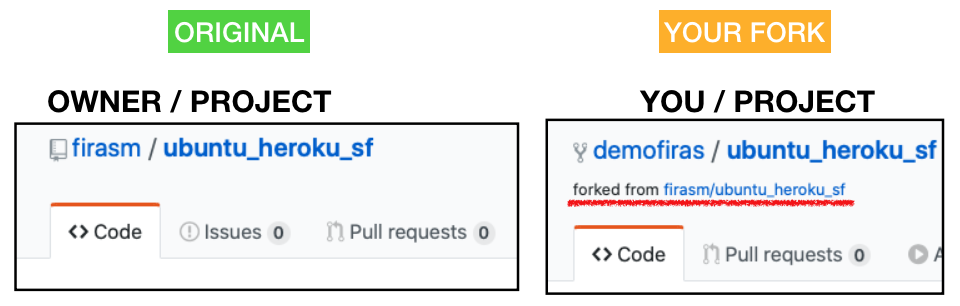
Here are the next steps:
- Copy the “CLONE URL” of
YOU/PROJECT(it should look something like https://github.com/YOU/PROJECT.git) - Open R Studio on your computer
- Create a new “Version Control >> Git” project in the appropriate location
- For the “repository URL” specify the CLONE URL from step 1
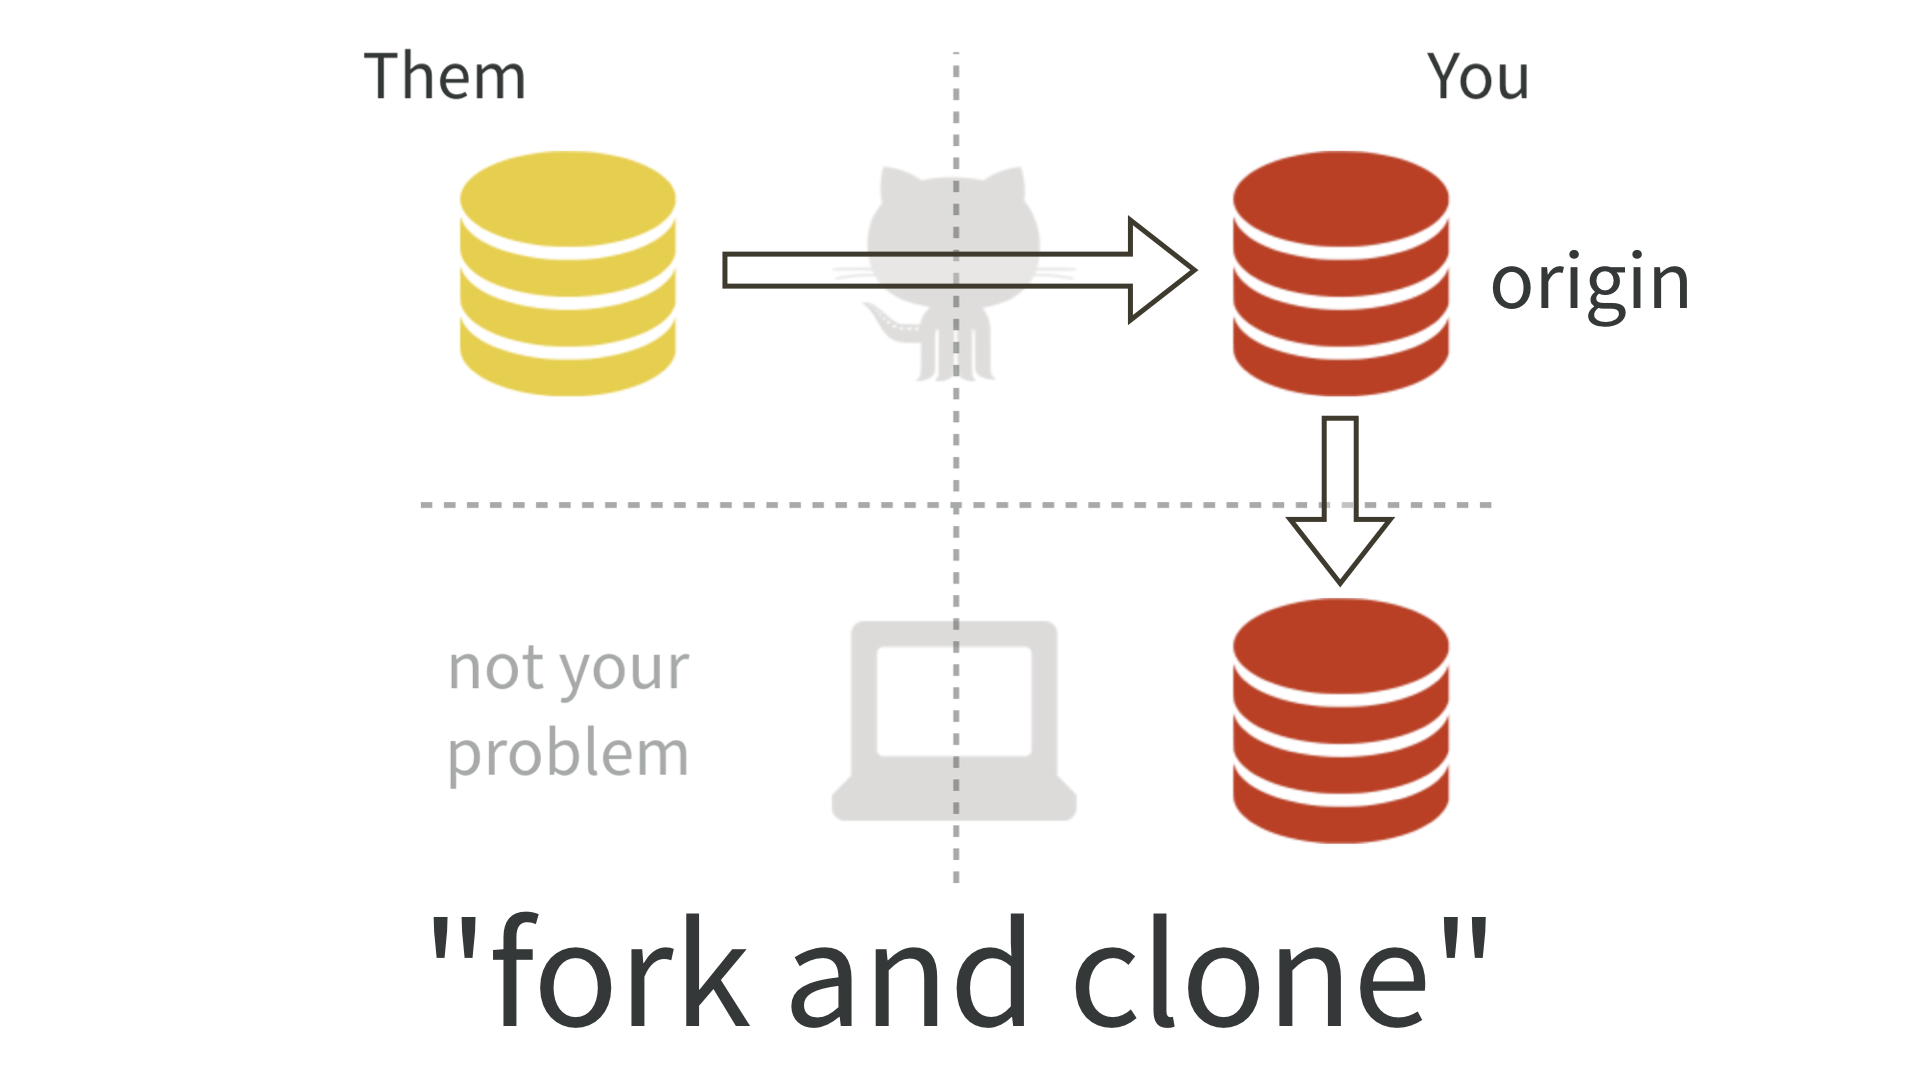
We’re doing this:
 ### Don’t mess with
 master {#dont-touch-master}
If you make any commits in your local repository, you should work in a new branch, not master.
You shouldn’t make (code) commits to master of a repo you have forked.
This will make your life much easier if you want to pull upstream work into your copy. The OWNER of PROJECT will also be happier to receive your pull request from a non-master branch.
16.3.2 The original repo as a remote
Remember we are here:
Here is the current situation in words:
- You have a fork
YOU/PROJECT, which is a repo on GitHub. - You have a local clone of your fork.
- Your fork
YOU/PROJECTis the remote known asoriginfor your local repo. - You are well positioned to make a pull request to
OWNER/PROJECT.
But notice the lack of a direct connection between your local copy of this repo and the original OWNER/PROJECT.
This is a problem - how will you ever get changes made to the original project?
As time goes on, the original repository OWNER/PROJECT will continue to evolve.
You probably want the ability to keep your copy up-to-date.
In Git lingo, you will need to get the “upstream changes”.
The next section deals with that.
16.4 Part 3: Getting changes from “upstream”
This workflow is relevant if you have done fork and clone and now you need to pull subsequent changes from the original repo into your copy.
You should set this up right away after you fork and clone, even though you don’t need it yet.
Vocabulary: OWNER/PROJECT refers to the original GitHub repo, owned by OWNER, who is not you.
YOU/PROJECT refers to your copy on GitHub, i.e. your fork.
16.4.1 No, you can’t do this via GitHub
You might hope that GitHub could automatically keep your fork YOU/PROJECT synced up with the original OWNER/PROJECT. Or that you could do this in the browser interface. Then you could pull those upstream changes into your local repo.
But you can’t.
There are some tantalizing, janky ways to sort of do parts of this. But they have fatal flaws that make them unsustainable. I believe you really do need to add OWNER/PROJECT as a second remote on your repo and pull from there.
16.4.2 Initial conditions
Get into the repo of interest, i.e. your local copy. For many of you, this means launching it as an RStudio Project. You’ll probably also want to open a terminal within RStudio for some Git work via Tools > Terminal > New Terminal.
Make sure you are on the master branch and your “working tree is clean”. git status should show something like:
On branch master
Your branch is up to date with 'origin/master'.

nothing to commit, working tree clean
BTW I recommend that you never make your own commits to the master branch of a fork.
However, if you have already done so, your situation is addressed here in section 29.8.
16.4.3 List your remotes
Let’s inspect the current remotes for your local repo. In the shell (Appendix ??):
Most of you will see output along these lines (let’s call this BEFORE):
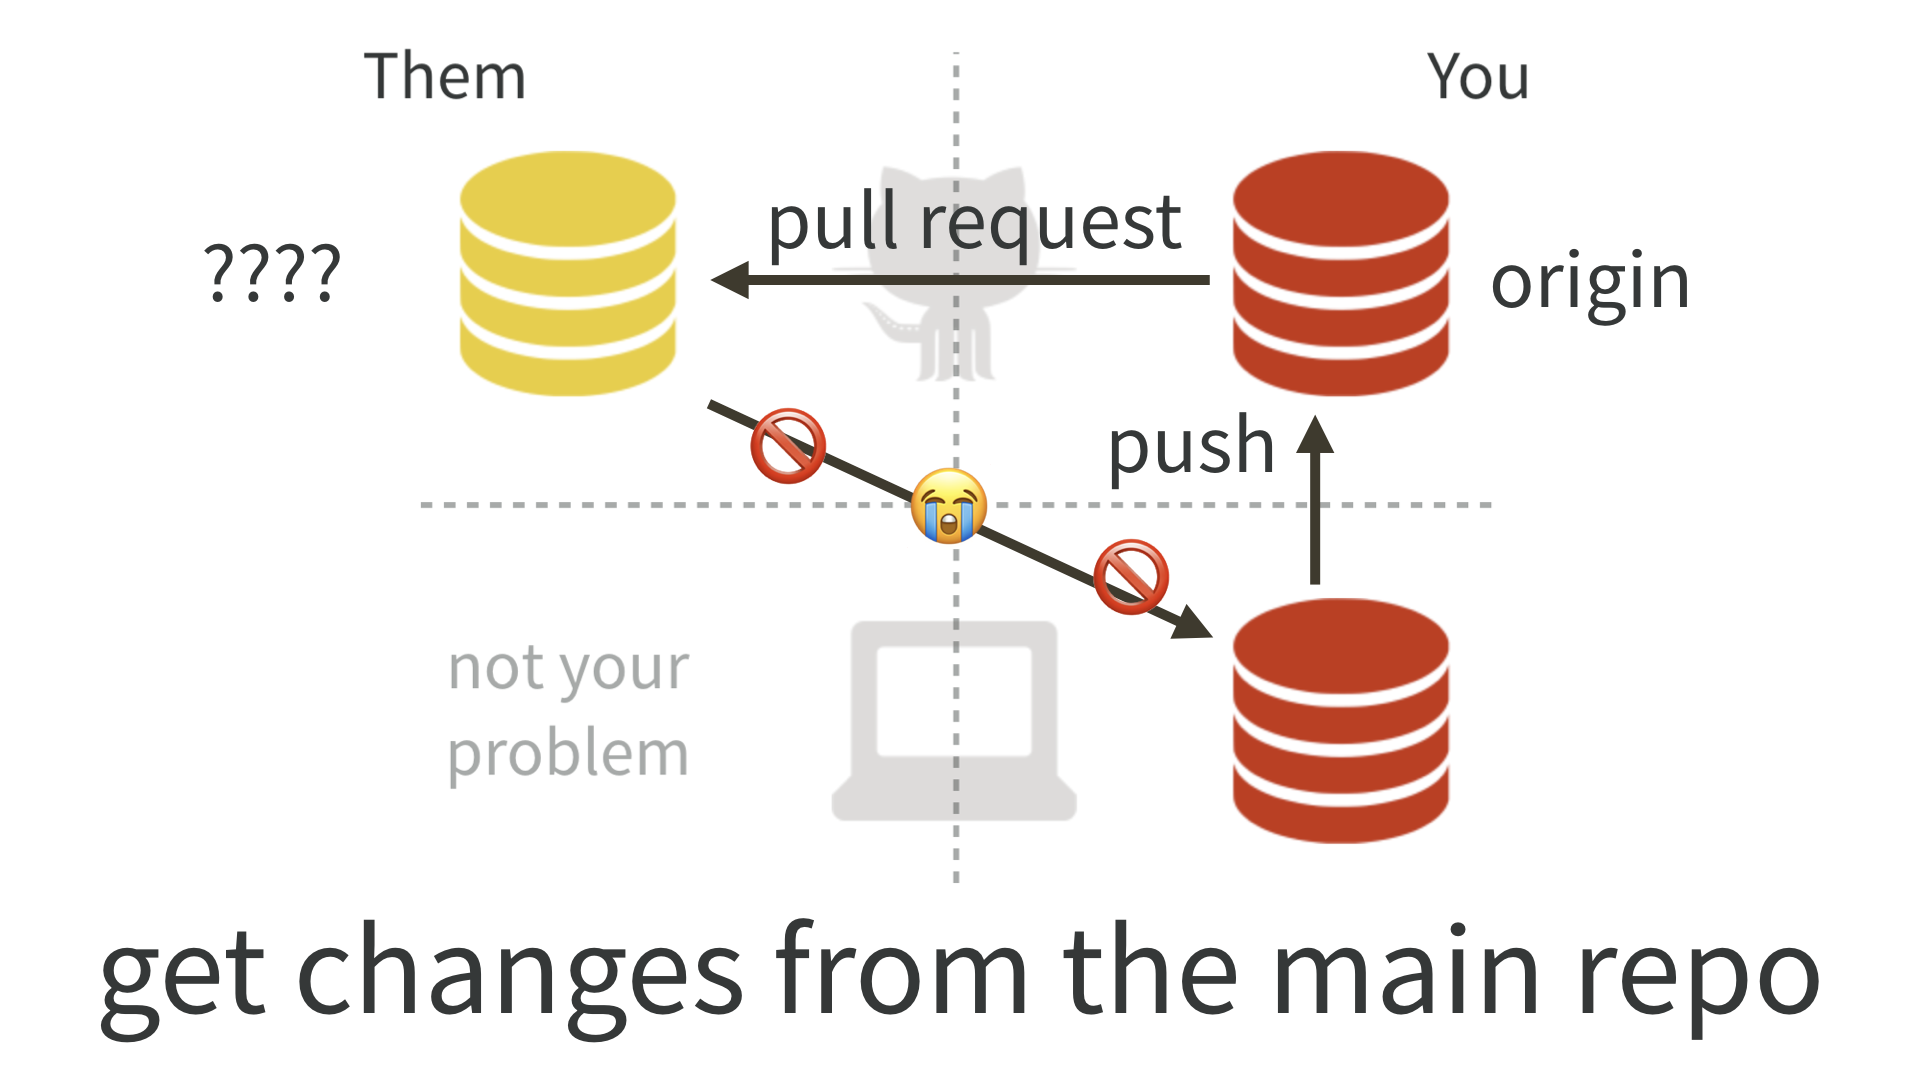
There is only one remote, named origin, corresponding to your fork on GitHub. This figure depicts a BEFORE scenario:
This is sad, because there is no direct connection between OWNER/PROJECT and your local copy of the repo.
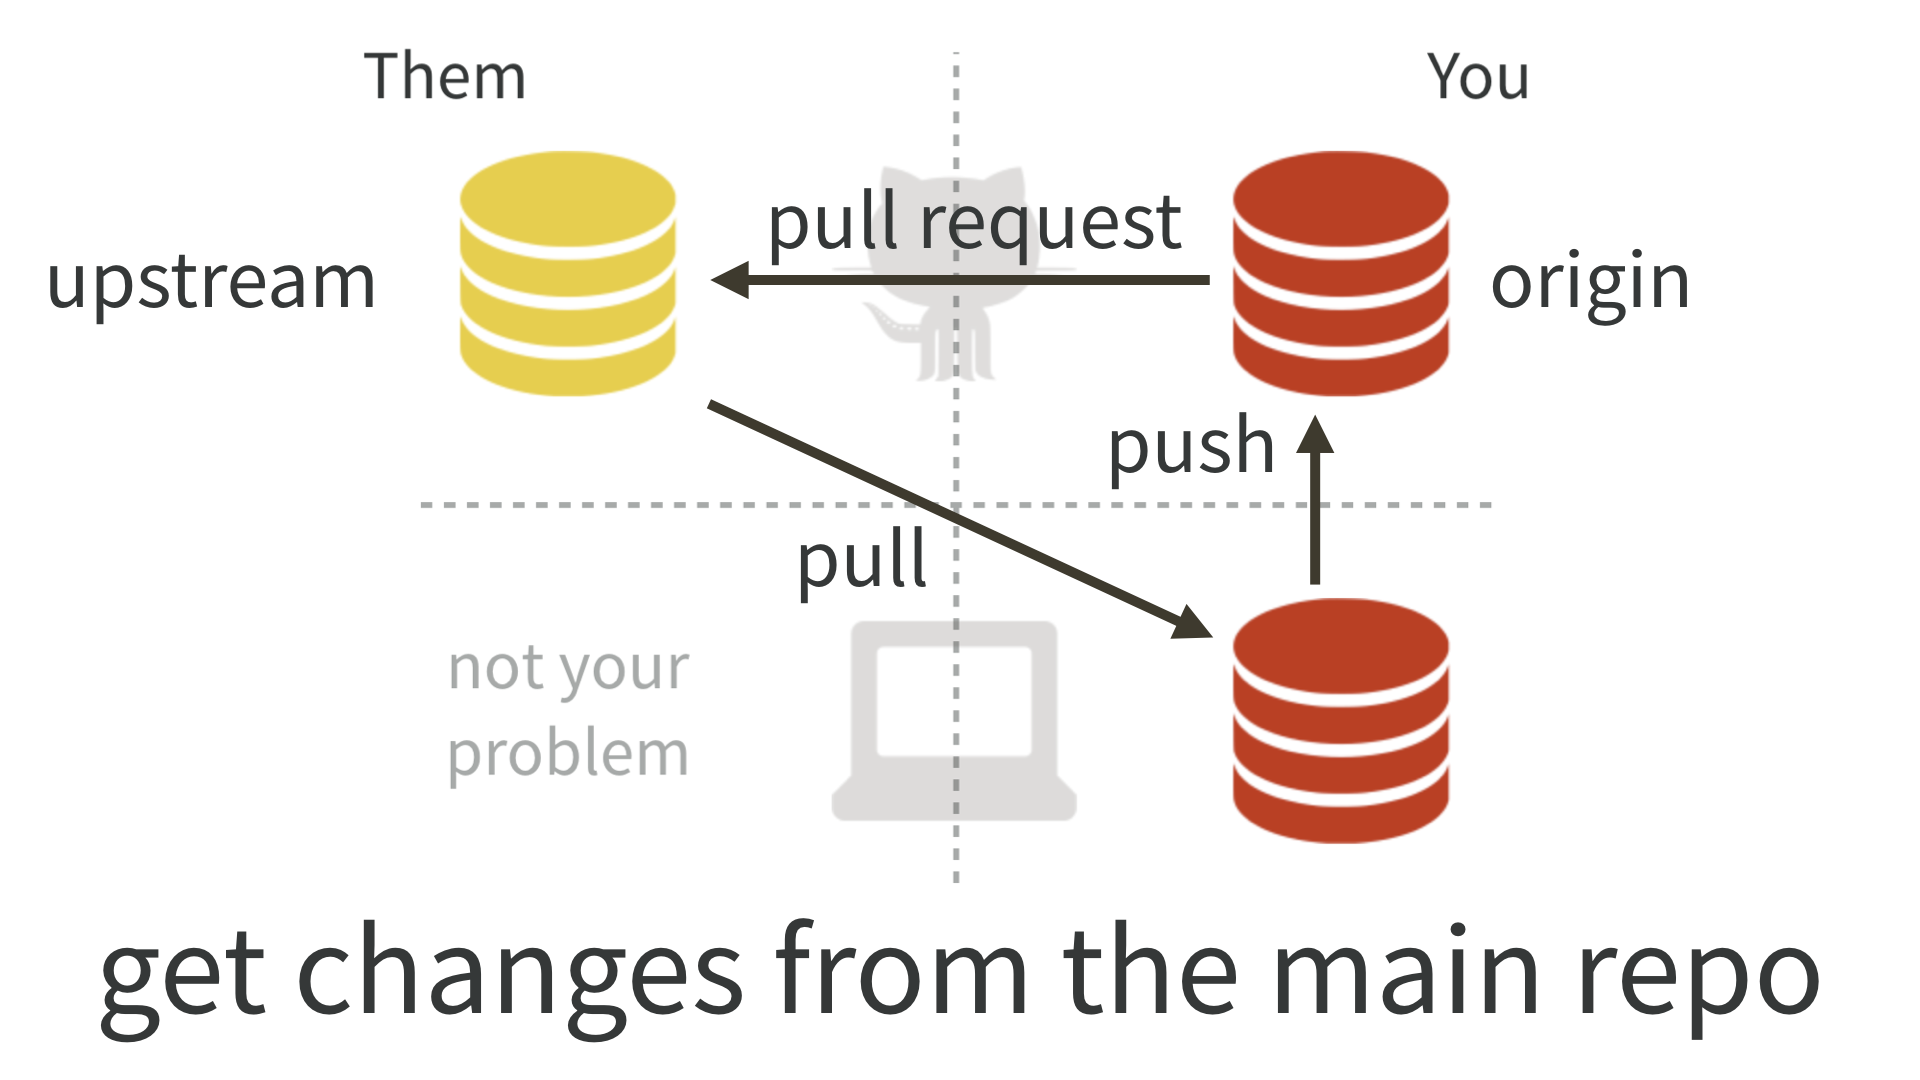
The state we want to see is like this (let’s call this AFTER):
origin https://github.com/YOU/PROJECT.git (fetch)
origin https://github.com/YOU/PROJET.git (push)
upstream https://github.com/OWNER/PROJECT.git (fetch)
upstream https://github.com/OWNER/PROJECT.git (push)Notice the second remote, named upstream, corresponding to the original repo on GitHub. This figure depicts AFTER, the scenario we want to achieve:
16.4.4 Add the upstream remote
Let us add OWNER/PROJECT as the upstream remote.
On GitHub, make sure you are signed in and navigate to the original repo, OWNER/PROJECT.
It is easy to get to from your fork, YOU/PROJECT, via “forked from” links near the top.
Use the big green “Clone or download” button to get the URL for OWNER/PROJECT on your clipboard.
Be intentional about whether you copy the HTTPS or SSH URL.
16.4.4.1 Command line Git
Use a command like this, but make an intentional choice about using an HTTPS vs SSH URL.
The nickname upstream can technically be whatever you want but there is a strong convention/tradition of using upstream
16.4.4.2 RStudio
This feels a bit odd, but humor me. Click on “New Branch” in the Git pane.
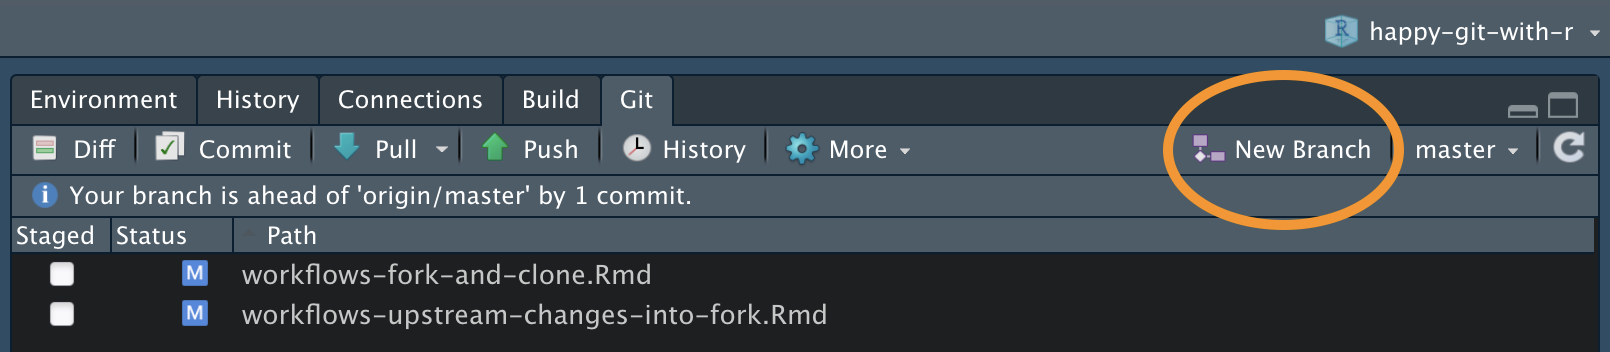 ]
]
This will reveal a button to “Add Remote”. Click it. Enter upstream as the remote name and paste the URL for OWNER/PROJECT that you got from GitHub. Click “Add”. Decline the opportunity to add a new branch by clicking “Cancel”.
16.4.5 Verify your upstream remote
Let’s inspect the current remotes for your local repo AGAIN. In the shell:
Now you should see something like
origin  https://github.com/YOU/PROJECT.git (fetch)
origin  https://github.com/YOU/PROJECT.git (push)
upstream https://github.com/OWNER/REPO.git (fetch)
upstream https://github.com/OWNER/REPO.git (push)Notice the second remote, named upstream, corresponding to the original repo on GitHub.
We have gotten to this:
16.4.6 Pull changes from upstream
Before we pull changes down, let’s first do a quick peek to see what WOULD happen if we pulled upstream changes.
Okay, now that we’re satisfied there are some changes, let’s pull the changes that we don’t have from OWNER/PROJECT into our local copy.
This says: “pull the changes from the remote known as upstream into the master branch of my local repo”.
We are being explicit about the remote and the branch in this case, because (as our git remote -v commands reveal), upstream/master is not the default tracking branch for local master.
See Um, what if I did touch master? to get yourself back on the happy path.
16.4.7 Push these changes to origin/master
Feel free to push the newly updated state of local master to your fork YOU/PROJECT and enjoy the satisfaction of being “caught up” with OWNER/PROJECT.
In the shell:
Or use the green “Push” button in RStudio.
16.4.8 Um, what if I did touch master?
I told you not to!
But OK here we are.
Let’s imagine this is the state of the original repo OWNER/PROJECT:
and and this is the state of the master branch in your local copy:
The two histories agree, up to commit or state C, then they diverge.
If you want to preserve the work in commits X, Y, and Z, create a new branch right now, with tip at Z, via git checkout -b my-great-innovations (pick your own branch name!). Then checkout master via git checkout master.
I now assume you have either preserved the work in X, Y, and Z (with a branch) or have decided to let it go.
Do a hard reset of the master branch to C.
You will have to figure out how to convey C in Git-speak. Specify it relative to HEAD or provide the SHA. See future link about resets for more support.
The instructions above for pulling changes from upstream should now work. Your master branch should reflect the history of OWNER/PROJECT:
If you chose to create a branch with your work, you will also have that locally:
If you pushed your alternative history (with commits X, Y, and Z) to your fork YOU/PROJECT and you like keeping everything synced up, you will also need to force push master via git push --force, but we really really don’t like discussing force pushes in Happy Git. We only do so here, because we are talking about a fork, which is fairly easy to replace if things so sideways.